Create your own Yahoo smiley using Photoshop
18
Apr'12
Member since:
Feb 2012
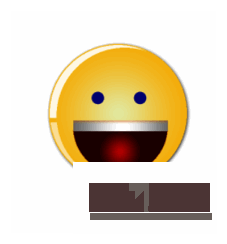
The smiley or smile emoticon of Yahoo is a pretty distinctive thing. However, it also represents a very universal message of happiness and good will. In this tutorial, we will help you learn how to create your very own, yahoo-like smiley. Hopefully, you can find this useful for your themed posters, event flyers or maybe even your brochure prints and booklet prints, as well as your other promotional or educational print material, where a smile might help lighten the mood of your layout. So just keep in reading and learn how you can create your own Yahoo Smiley for yourself.
Final Image

Step
01
Member since:
Feb 2012
The smiley or smile emoticon of Yahoo is a pretty distinctive thing. However, it also represents a very universal message of happiness and good will. In this tutorial, we will help you learn how to create your very own, yahoo-like smiley. Hopefully, you can find this useful for your themed posters, event flyers or maybe even your brochure prints and booklet prints, as well as your other promotional or educational print material, where a smile might help lighten the mood of your layout. So just keep in reading and learn how you can create your own Yahoo Smiley for yourself.
1. Initially, create a new document with the size that you need. Pay attention to the resolution, especially if you are going to use the smiley on print materials. Go for 150 to 300 ppi at least for most deployments to be sure.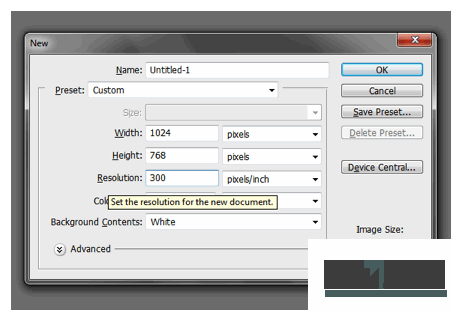
1. Initially, create a new document with the size that you need. Pay attention to the resolution, especially if you are going to use the smiley on print materials. Go for 150 to 300 ppi at least for most deployments to be sure.

Step
02
Member since:
Feb 2012
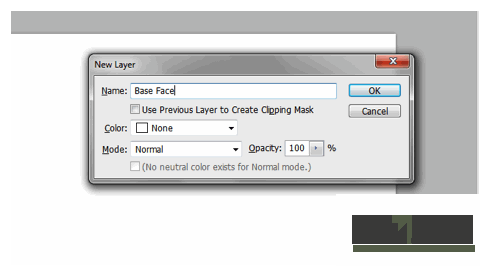
2. Now, with a new document in hand, let us start by creating a new layer. Just press CTRL+SHIFT+N to create a new layer. Name it the way you like, but for our example, we are going to call it the base face.

Step
03
Member since:
Feb 2012
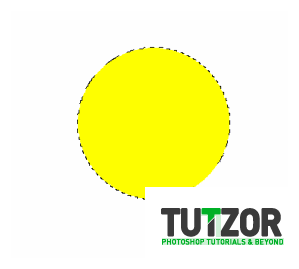
3. Now, use the elliptical marquee tool to create a rounded selection. Make sure to hold down the shift key as you create the selection to make sure that the circle is perfectly round. Fill this with a yellow color for now.

Step
04
Member since:
Feb 2012
4. Next, double click on our circle layer. In the blending options window that should appear, click on the checkbox for drop shadow. Apply the following settings.
a. Blend Mode: Normal
b. Opacity: 100%
c. Angle: 130 degrees
d. Distance: 2px
e. Size:8px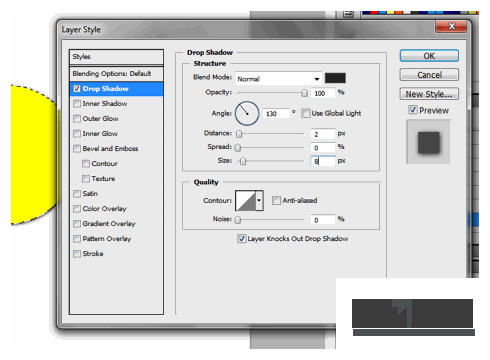
a. Blend Mode: Normal
b. Opacity: 100%
c. Angle: 130 degrees
d. Distance: 2px
e. Size:8px

Step
05
Member since:
Feb 2012
5. Next, tick of the gradient overlay check box. Use the following settings for this effect.
a. Blend Mode: Normal
b. Opacity: 100%
c. Gradient: Yellow Orange to Light Yellow (try #f6b913 to #e7ecaf)
d. Style: Radial
e. Angle: 90 degrees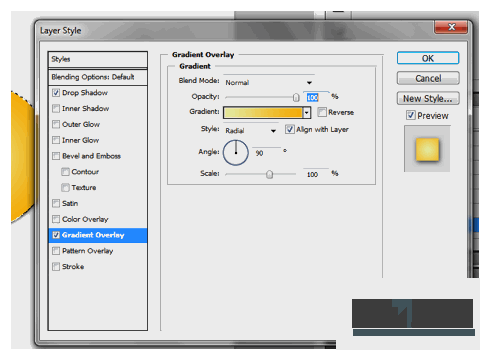
a. Blend Mode: Normal
b. Opacity: 100%
c. Gradient: Yellow Orange to Light Yellow (try #f6b913 to #e7ecaf)
d. Style: Radial
e. Angle: 90 degrees

Step
06
Member since:
Feb 2012
6. Now we should have a great look base for your smiley.


Step
07
Member since:
Feb 2012
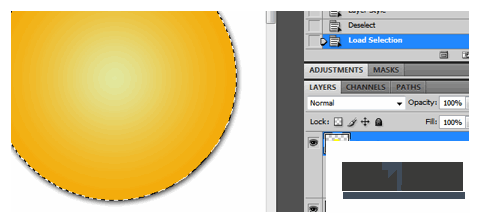
7. To add the glossy elements, first reselect the area of the base face. Do this by holding down the control key and then clicking on the thumbnail picture of the layer of the base face. This should select the circle area of the face.

Step
08
Member since:
Feb 2012
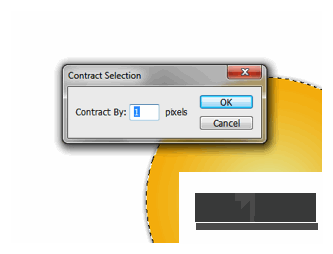
8. Now, create a new layer by pressing CTRL+SHIFT+N. Then, go to Select -> Modify -> Contract. In the window that opens enter a 1-3 pixel value for the contraction (depending on the size of your smiley). This will reduce the selection area by 1-3 pixel.

Step
09
Member since:
Feb 2012
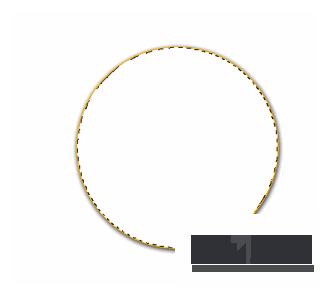
9. Then, add a fill of white to the newly contracted circle selection.

Step
10
Member since:
Feb 2012
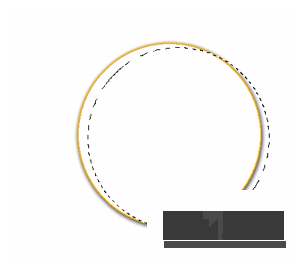
10. With the selection still active, use the arrow keys to move the selection 10 pixels to the right and 4 pixels downwards. (this can vary again depending on how big your smiley is) Just judge the number of nudges depending on what you see below.

Step
11
Member since:
Feb 2012
11. Press the Backspace key to delete the area where the selection resides. This will give use the initial side glow effect.


Step
12
Member since:
Feb 2012
12. Cut the side glow near the bottom like so. Use the eraser tool to do this.


Step
13
Member since:
Feb 2012
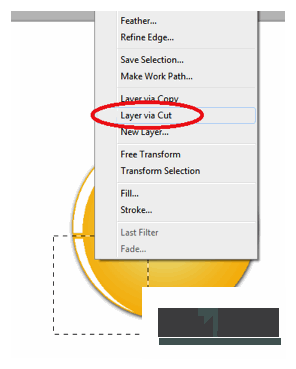
13. Now, we will create 2 layers out of those top and bottom side gloss areas. Simply use the rectangular marquee tool to select the bottom half of the gloss area. Then right click on it and select the option to “Layer via Cut”.

Step
14
Member since:
Feb 2012
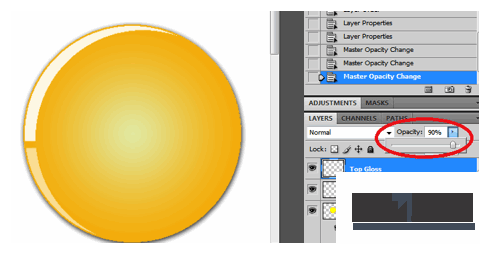
14. Now reduce the opacity of both the top gloss layer and the bottom gloss layer. Use a 90% value for the top layer, and a 60% value for the bottom layer.

Step
15
Member since:
Feb 2012
15. Now, using the ellipse tool, create the eyes. Make sure you hold down the shift key as you create them to make sure they are perfectly circular. Color these circles a dark blue color. It would be best to just create one eye first, then duplicate it afterwards for a more uniform look.


Step
16
Member since:
Feb 2012
16. Now we shall make the mouth. Create a new layer and use the elliptical marquee tool to create a circle for the mouth.


Step
17
Member since:
Feb 2012
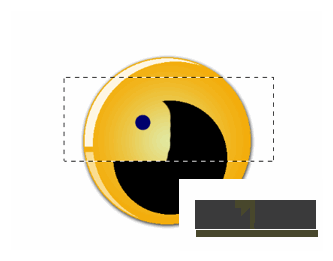
17. Next, use the rectangular marquee tool to cut the circle in half. Simply inscribe the rectangle across half the circle and then use the eraser tool to get rid of the top part of the circle.

Step
18
Member since:
Feb 2012
18. Now, go to the blending options for our mouth layer and apply the gradient overlay effect. Use a red to dark red gradient. Here are the details.
a. Blend Mode: Normal
b. Opacity: 100%
c. Style: Radial
d. Angle: 90 degrees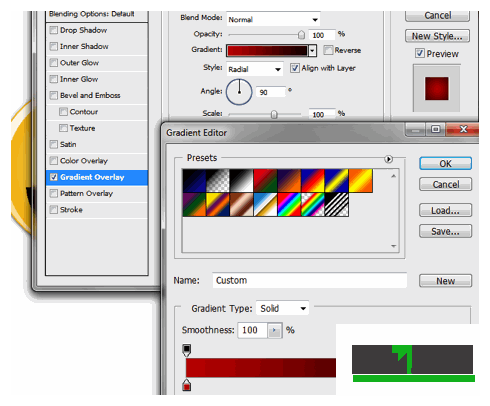
a. Blend Mode: Normal
b. Opacity: 100%
c. Style: Radial
d. Angle: 90 degrees

Step
19
Member since:
Feb 2012
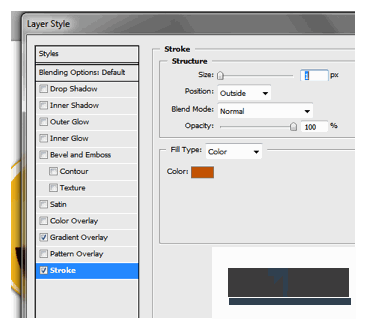
19. Finally, add a 1 pixel dark orange stroke by clicking on the stroke checkbox and setting these values.

Step
20
Member since:
Feb 2012
20. That gives us the basic smile shape.


Step
21
Member since:
Feb 2012
21. Finally, let us add the teeth. With a new layer, use the rectangle shape tool to create the teeth on top of the mouth layer


Step
22
Member since:
Feb 2012
22. Now, open its blending options and tick off the inner shadow option. Use these values.
a. Blend Mode Normal
b. Opacity: 50% (depending on the size)
c. Angle: 90 Degrees
d. Distance: 4
e. Shadow: 5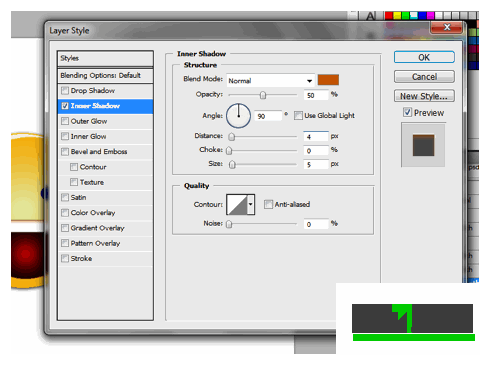
a. Blend Mode Normal
b. Opacity: 50% (depending on the size)
c. Angle: 90 Degrees
d. Distance: 4
e. Shadow: 5

Step
23
Member since:
Feb 2012
23. Then tick off the gradient overlay button and use these values.
a. Blend mode: Normal
b. Opacity: 100%
c. Gradient: Grey, White, Grey
d. Style: Linear
e. Angle: 0 degrees
f. Scale 109%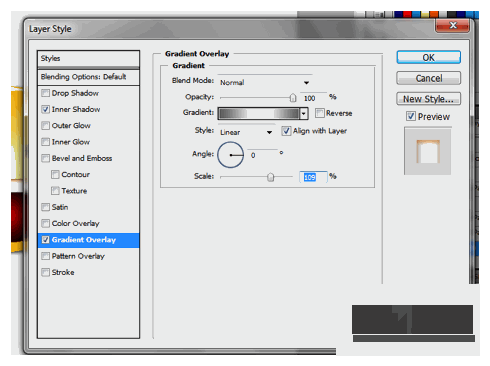
a. Blend mode: Normal
b. Opacity: 100%
c. Gradient: Grey, White, Grey
d. Style: Linear
e. Angle: 0 degrees
f. Scale 109%

Step
24
Member since:
Feb 2012
24. Great! You now have a yahoo like smiley you can customize on your own. Congratulations!
