How To Make a “Pop” Poster Design Using Photoshop
22
May'12
 irenethompson80
Member since:
Feb 2012
In this guide, we will go through the whole process of creating a serigraphy type or “pop” art style image which you can apply on big flyers or posters.
Final Image

Step
26
 irenethompson80
Member since:
Feb 2012
In this guide, we will go through the whole process of creating a serigraphy type or “pop” art style image. You do not have to be a total expert at doing this in Photoshop, but it helps if you know the basics and have a pretty steady hand on the mouse. Let’s get started.
STEP 1 Before starting with the poster itself, let us first process the feature image. Any portrait picture is fine really. However, it will be best for you to use a portrait picture that has the person’s face close up, with a blank background behind them. For this tutorial we are going to start with this picture.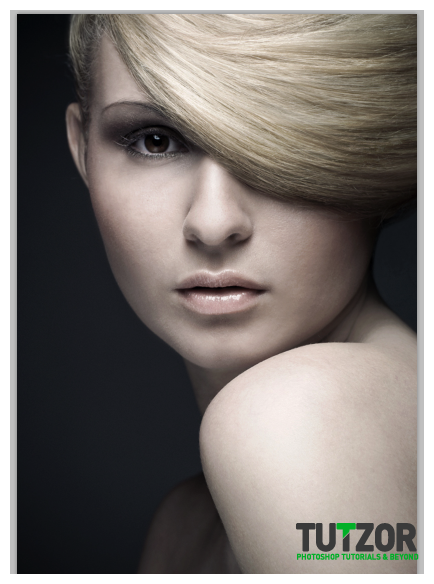
STEP 1 Before starting with the poster itself, let us first process the feature image. Any portrait picture is fine really. However, it will be best for you to use a portrait picture that has the person’s face close up, with a blank background behind them. For this tutorial we are going to start with this picture.

Step
27
 irenethompson80
Member since:
Feb 2012
STEP 2
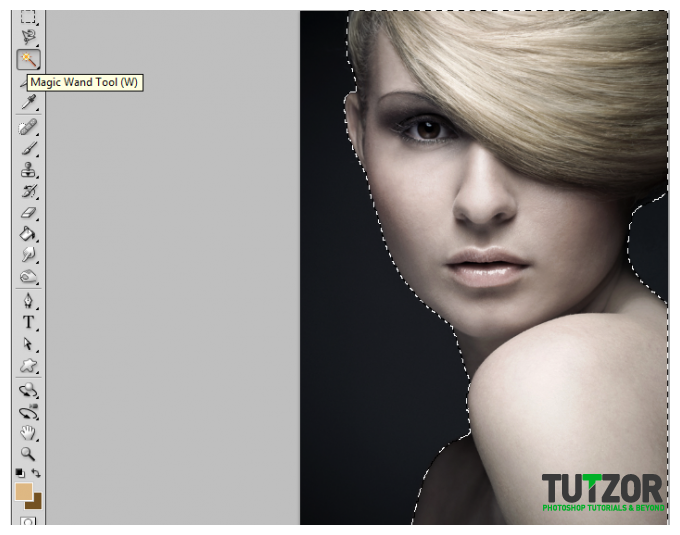
First, we will want to lift our feature model out of the her background. For beginners, the easiest tool to use is the Magic Wand tool. Simply click on this tool and click on the background (Hold down SHIFT if there are multiple areas where the background appears). Then select the inverse (CTRL+SHIFT+I) and then copy and paste the selected area. You will then have a new layer with only the main model in it. If this does not do the trick, you will then need to use either the Magnetic lasso tool or the pen tool to do the selections. Whatever happens, just make sure you cleanly lift the model from the background.

Step
28
 irenethompson80
Member since:
Feb 2012
STEP 3
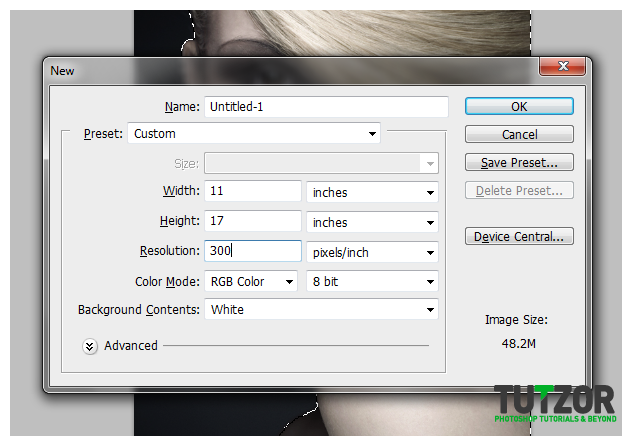
Good, now with that selection still active, create a new document (CTRL+N). Set your dimensions as you need for the poster. Be mindful though of the resolution as for printing a value of 300ppi is considered the professional minimum for good quality prints. I suggest you polish your lasso work so as not to see undesirable jagged edges on larger size prints like posters or big flyers specially if your model will take up a big chunk of the real estate.

Step
29
 irenethompson80
Member since:
Feb 2012
STEP 4
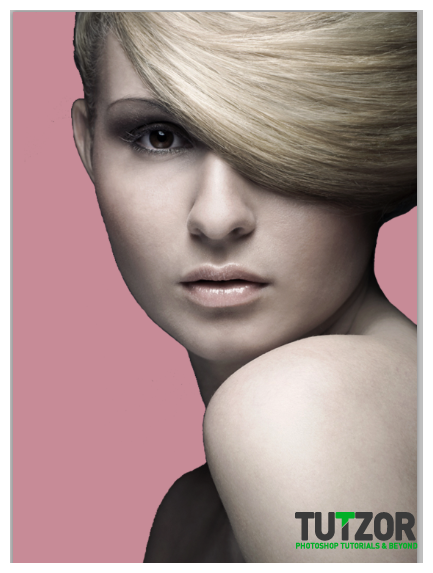
Now, with the new document open, paste in the model we just lifted. Then select the background layer and fill it with a theme color.

Step
30
 irenethompson80
Member since:
Feb 2012
STEP 5
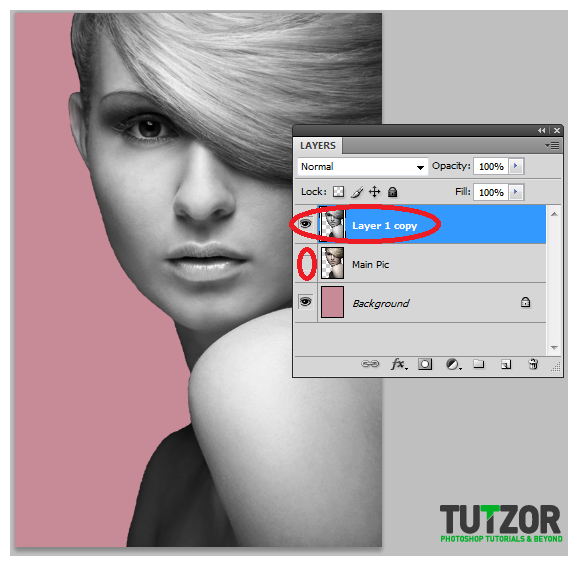
Now, create a backup of our main feature image by pressing CTRL+J whilst you have its layer selected. Hide this by clicking the visibility icon (eye icon). Now, select the duplicate of the image and press CTRL+SHIFT+U to de-saturate the image, removing the color values.

Step
31
 irenethompson80
Member since:
Feb 2012
STEP 6
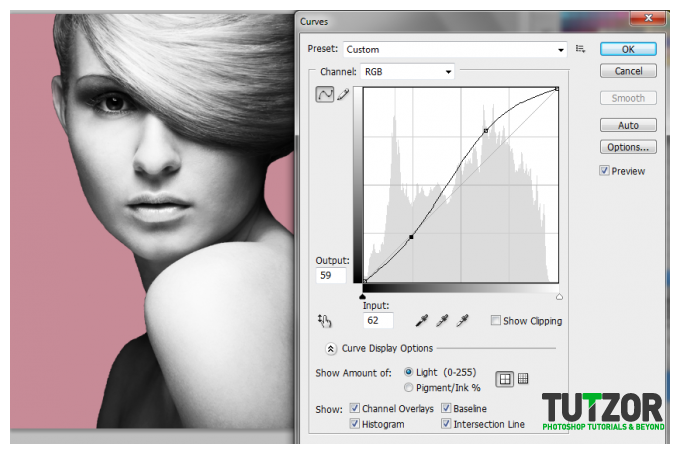
Now we will adjust our image a little. With our duplicate de-saturated layer selected, go to Image -> Adjustments -> Curves… Once the curves window opens adjust the curves so that they look a bit like the curve seen in the image below. You do not have to be precise about this, just create the general curve appearance. Watch the preview of your image, make sure that you get a bit of a good contrast between with the dark and white areas of your image.

Step
32
 irenethompson80
Member since:
Feb 2012
STEP 7
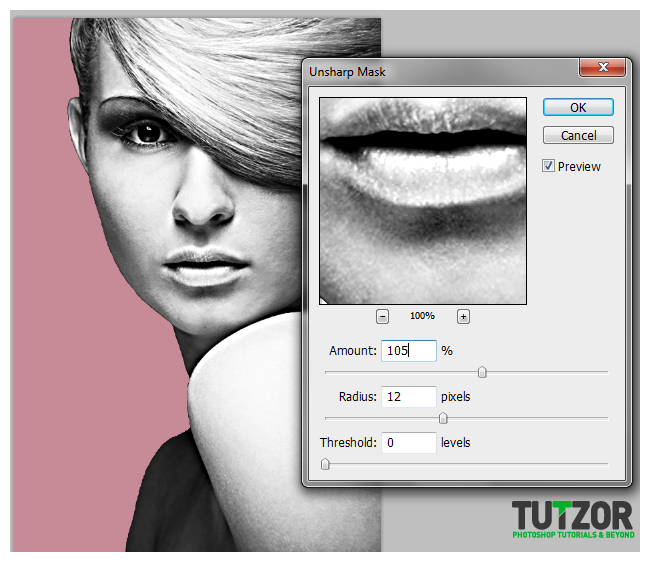
Now, we shall apply some filters. With the layer still selected, go to Filters -> Sharpen -> Unsharp Mask… In the window that opens, adjust the sliders so that you get some textures and noise in your image. Now, there are no exact values to cover, you just need that somewhat old gritty feel. You can use the values below as a starting point though for the settings.
a. Amount: 105%
b. Radius: 12px
c. Threshold: 0

Step
33
 irenethompson80
Member since:
Feb 2012
STEP 8
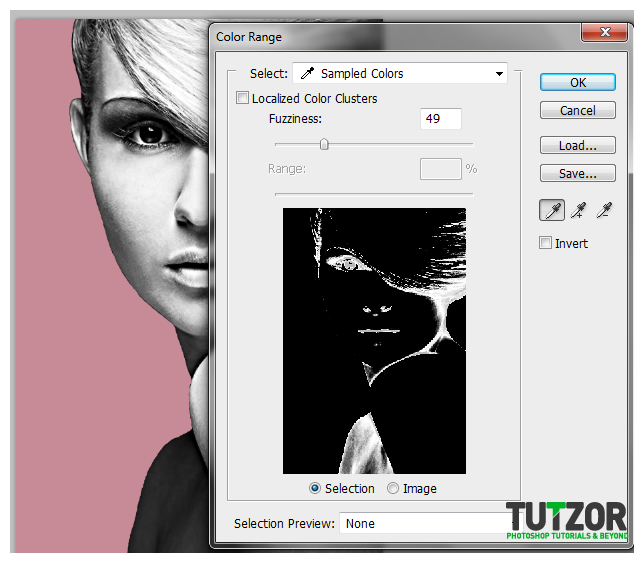
Next, go to Select -> Color Range… In the window that opens, select Sampled Colors. Make sure that you tick off the “Selection” option below. Then, using the eye dropper, click on a dark shadowed portion of your image. This will select all the shadowed elements in your image. Once done, adjust the fuzziness so that you select the shadowed details. For our example we used a value of 49, but try to adjust it for your own image so that the details of the hair, eyes, nose and mouth is selected.

Step
34
 irenethompson80
Member since:
Feb 2012
STEP 9
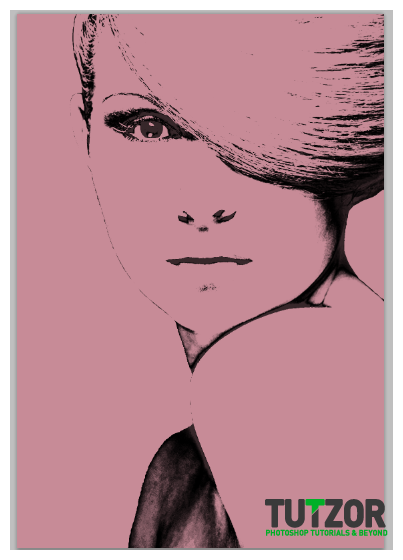
Once selected, press CTRL+SHIFT+N to create a new layer. Click on it and then fill our selection with black. This will put a black color on the selection we made earlier. For your reference, we have hidden the other layers in the image below for you to see the effect we just did.

Step
35
 irenethompson80
Member since:
Feb 2012
STEP 10
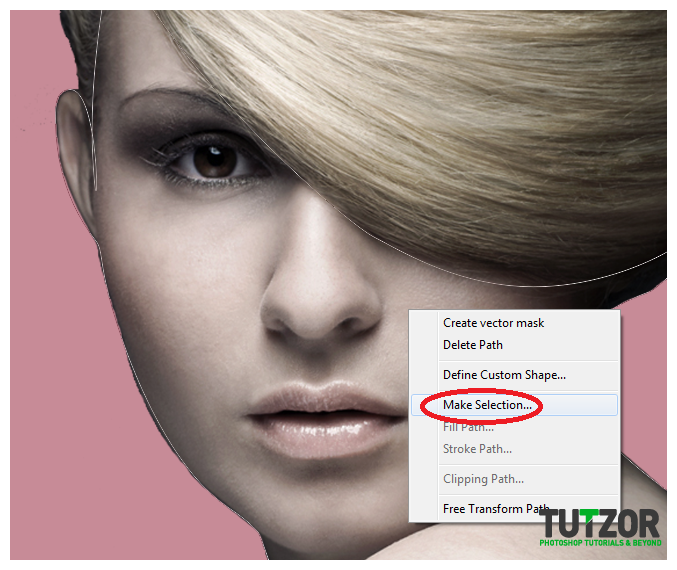
Good. Now we hide all the other layers except the background and the ORIGINAL layer. We did this because we are going to do some tracing. Using the pen tool, trace the areas of the model where the skin shows. It does not have to be precise, just make sure you cover the all the visible skin parts. Also make sure that you click on the option “Form Paths” so that you do not inadvertently create a shape. Once done with your tracing, right click on the image and select “Make selection…”

Step
36
 irenethompson80
Member since:
Feb 2012
STEP 11
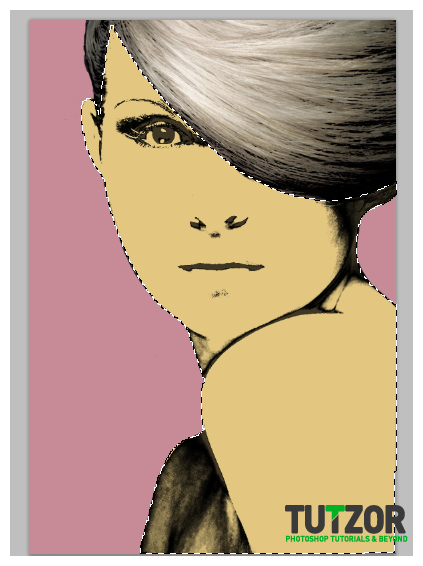
Then, create a new layer just below the shadow layer that we created earlier. With our traced area still selected, fill the selection with a skin tone or flesh color. Now, if you remove the visibility of our original layer again, and add the shadow’s visibility as well you should get this result:

Step
37
 irenethompson80
Member since:
Feb 2012
STEP 12
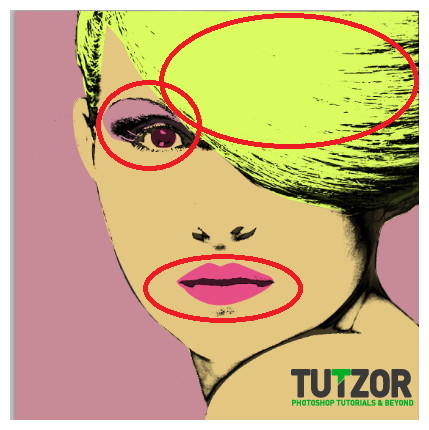
Now, using the same procedure as above, we trace out the lips, the eyes, the area for the eye shadow as well as the hair.

Step
38
 irenethompson80
Member since:
Feb 2012
STEP 13
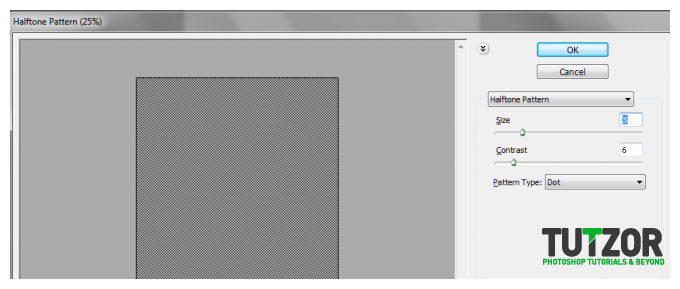
Now, we add a few more textures and patterns. The first step to do this is to create a new layer again (press CTRL+SHIFT+N). Fill this new layer with a white color. Make sure that you have the foreground color set to white, and the background set to black (press D then X if you want to do this quickly). Then, go to Filters –> Sketch -> Halftone Pattern. Set the values as such:
a. Size: 3
b. Contrast: 6
Take note that you can adjust this as needed for your design.

Step
39
 irenethompson80
Member since:
Feb 2012
STEP 14
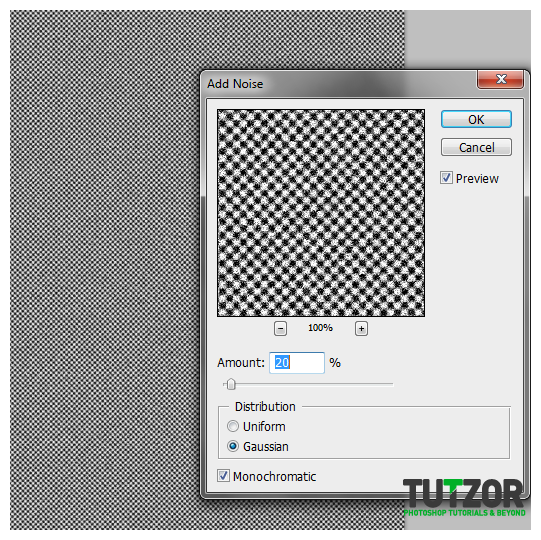
Afterwards, we go to Filter -> Noise -> Add Noise. Adjust the amount to around 20%. Click on “Gaussian” distribution and tick of the checkbox for “Monochromatic”.

Step
40
 irenethompson80
Member since:
Feb 2012
STEP 15
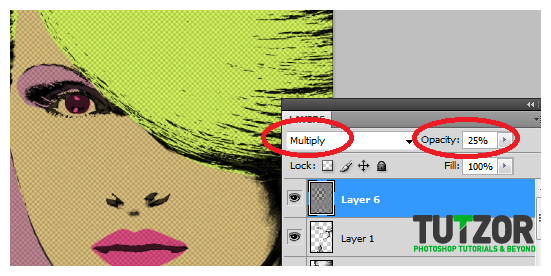
Once the filters are set, change the blend mode of this layer to multiply, and reduce its opacity to 25%. You should see the patter appear in our design.

Step
41
 irenethompson80
Member since:
Feb 2012
STEP 16
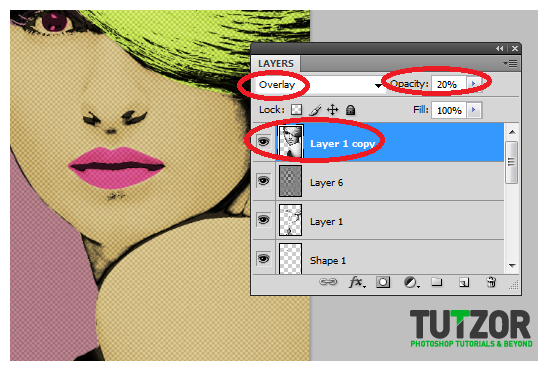
Next, take the layer that had the “unsharp mask” earlier and bring it to the front. Change its blend mode to “Overlay” and reduce its opacity to around 20% to add just some subtle features and shadows for the face and back of our model.

Step
42
 irenethompson80
Member since:
Feb 2012
STEP 17
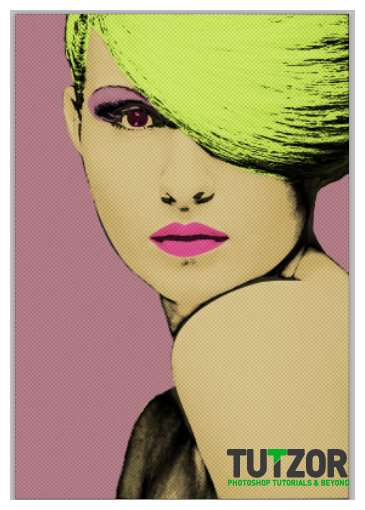
Great! Now the Pop art model is done! Our next step is to just add some text and callouts.

Step
43
 irenethompson80
Member since:
Feb 2012
STEP 18
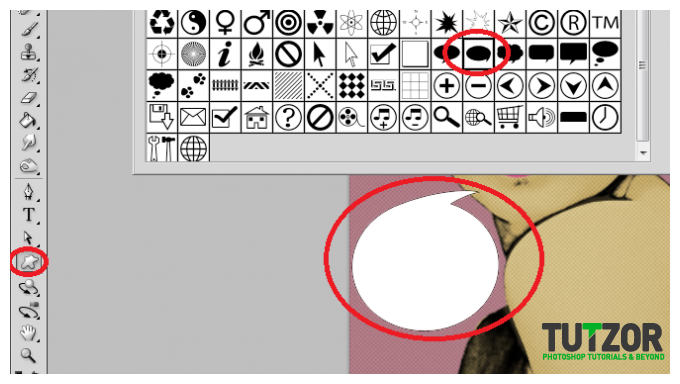
Go to the custom shape tool choices, and choose one of the callout/talk shapes. Place the shape to our design. Take note that you can alter its size and dimensions by pressing CTRL+T and then transforming the shape to fit your needs.

Step
44
 irenethompson80
Member since:
Feb 2012
STEP 19
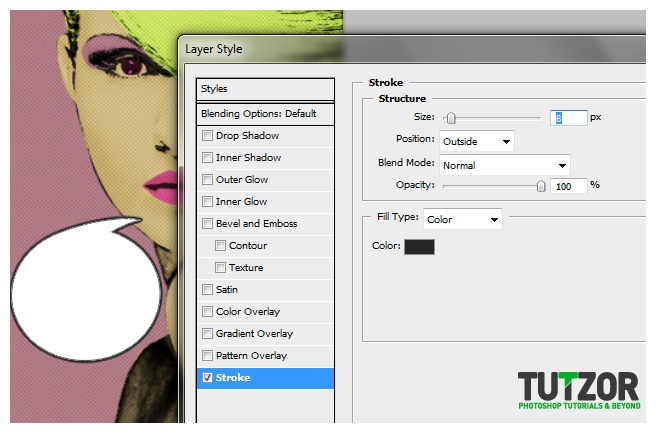
Next, double click on this new shape. The layer styles window should appear. First click on the “stroke” option and use an 5-8px black stroke for your callout. (note that you can adjust this as necessary).

Step
45
 irenethompson80
Member since:
Feb 2012
STEP 20
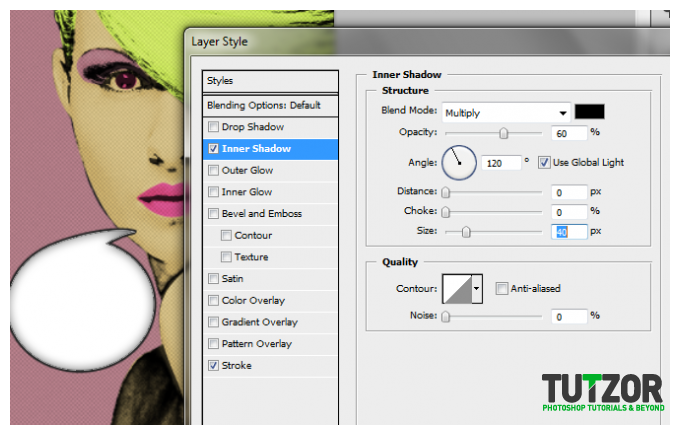
Also, click on “inner shadow” and use these values for the callout.
a. Opacity: 60%
b. Distance: 0
c. Size: 40px
a. Opacity: 60%
b. Distance: 0
c. Size: 40px

Step
46
 irenethompson80
Member since:
Feb 2012
STEP 21
Finally, you can add your text. This is done of course using the Text Tool. Here we are using a Comic style font for the best results.


Step
47
 irenethompson80
Member since:
Feb 2012
FINAL IMAGE
Great! We have now finished for Serigraphy-Pop Style poster! Now you can use these tricks to create your own. Good luck!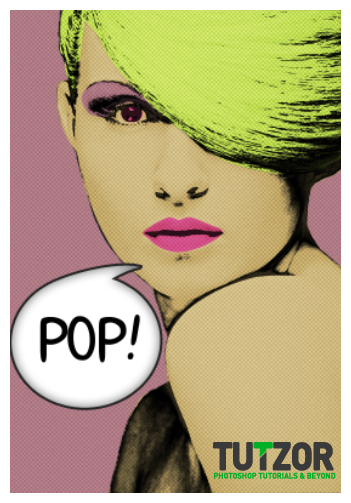
Great! We have now finished for Serigraphy-Pop Style poster! Now you can use these tricks to create your own. Good luck!

Step
48
 irenethompson80
Member since:
Feb 2012
Hope you enjoy the tutorial! Swing by PrintPlace Tutorials to find more of this.


